This is the best cake I’ve ever had. Whenever I’ve made it, I got loads of compliments. I had made this cake for my husband’s birthday last year. That time I made this cake with eggs. This time, I made it for a really good friend of mine. It’s been a year since I started by blog and I’ve learnt so much in this one year. I’ve made eggless cupcakes and cookies but I never made an eggless cake. It was a difficult decision but I thought, why not give it a try. J
So, this time I made an eggless cake. It came out really good. It was soft and super delicious. This cake actually requires 3 eggs, so if you want, you could make it with eggs but I love the eggless version too..!!
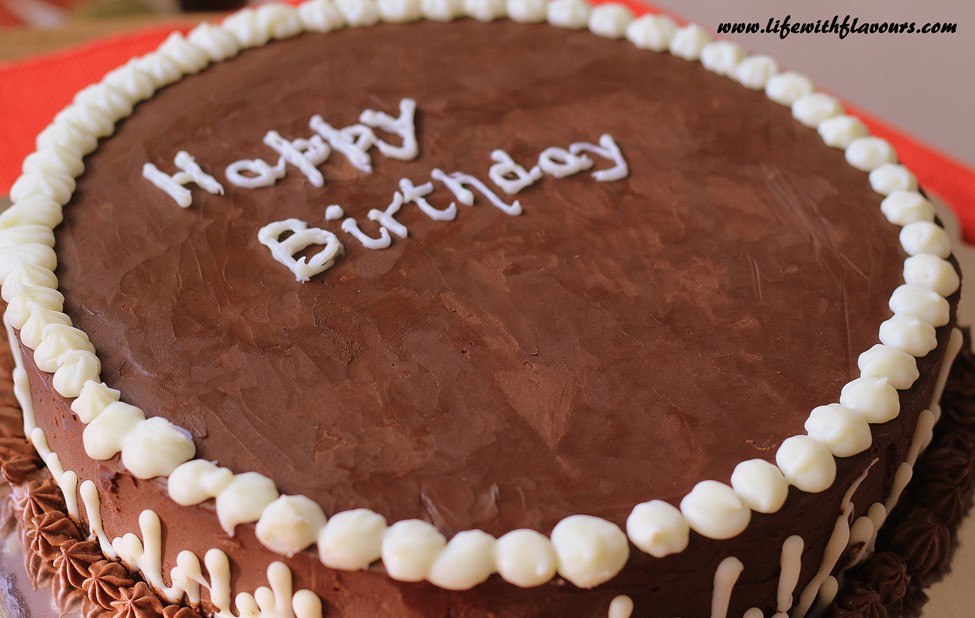
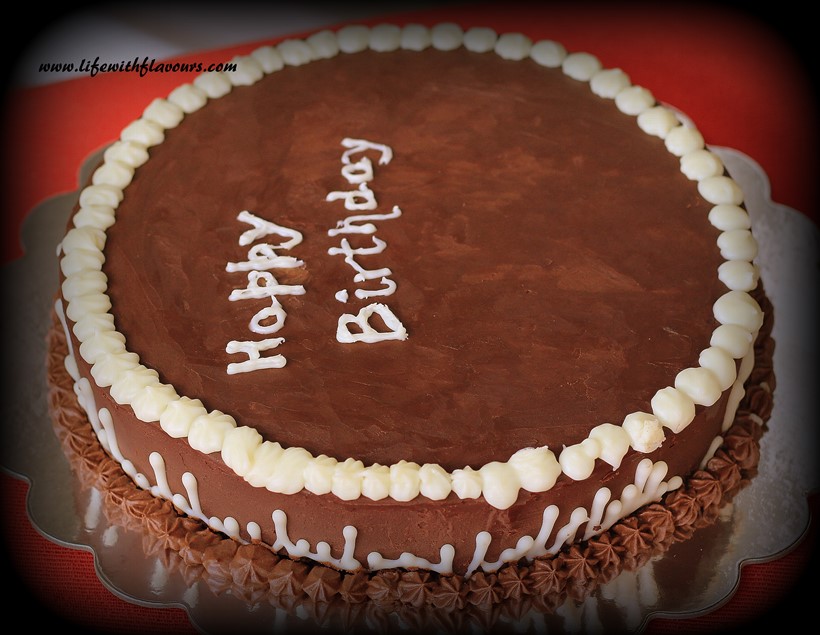
Also, this frosting is CHOCOLATE GANACHE.. Yummyyyyyy..!! I love this frosting..!! It’s super rich and super yummy. I don’t relish buttercream frosting and I can’t eat fondant. I just do not like it. This chocolate ganache is simply amazing. I will also be telling you to make the semi-sweet chocolate ganache and also white chocolate ganache.
I’m not a professional, so just tried my best..!! J
Let’s get started..!! J
Preparation Time- 10 mins Cooking Time- 40 mins
Decorating and Cooling Time- 4 hours Serves- about 20
All You Need:
For Semi-Sweet Chocolate Ganache
- Semi-Sweet Chocolate Chips- 2 ½ cups
- Heavy Whipping Cream- 1 ⅓ cups
For White Chocolate Ganache
- White Chocolate Chips- 1 cup
- Heavy Whipping Cream- ¾ Cup
For The Cake
- All Purpose Flour- 2 ¼ cups
- Cocoa Powder- ¾ Cup
- Butter- 1 Cup (softened at room temperature)
- Granulated Sugar- 2 Cups
- Baking Powder- 1 Tsp
- Baking Soda- 2 Tsp
- Vinegar- 1 ½ Tbsp
- Milk- ⅓ Cup
- Instant Coffee Granules- 1 Tbsp
- Water- 1 Cup
- Vanilla Extract- 1 Tsp
- Salt- 1 Tsp
A Few Tips
- When you add vinegar, make sure the mixture has cooled down a little. As soon as you add the vinegar, the mixture will curdle, don’t be alarmed, it’s OK..!! J
- What I do is, I prepare the cake a night before and cool it down to room temperature. Then I wrap the cakes separately in plastic wraps and refrigerate them over night. What this does is, it allows the cake to become firm and avoid loose crumbs while frosting.
- For the frosting, you could just keep it simple without any decoration and just frost the cake with the ganache. I had done that as well. There would be no difference in the taste.. 😉
- If you are using salted butter, do not add salt.
- I love adding coffee to anything that involves chocolate. Coffee brings out the flavor of the chocolate..!! It’s just amazing.
Method
For the Cake
- Line 2 9″ Baking pans with parchment paper. Also, preheat the oven at 350°F.
- In a saucepan, add water, milk and instant coffee granules. Heat it until you see small bubbles forming on the rim of the mixture. Remove from the stove and allow it to cool down for 10 mins.
- In a bowl, cream together butter and sugar until it becomes creamy and is well combined.
- Add vanilla extract and mix.
- In a separate bowl, lightly mix all the dry ingredients (all-purpose flour, baking powder, baking soda, cocoa powder and salt).
- Once the coffee mixture cools down, add vinegar. (I would like to mention again, when you add vinegar, make sure the mixture has cooled down a little. As soon as you add the vinegar, the mixture will curdle, don’t be alarmed, it’s OK..!! J )
- Now add half of the dry ingredients and half of the coffee mixture to the butter mixture and combine well.
- Once combined, add rest of the dry mixture and coffee mixture and combine well.
- This cake mixture will be runny. It will not be as thick as other cakes batters.
- Now, divide the mixture between the 2 baking pans as equally as possible.
- Bake the cake for 25 mins or until a toothpick inserted comes out clean.
- Once done, let the cake cool down in the pan for 10 mins and then place them on a wire rack to cool completely.
- Once they have cooled down, wrap them in plastic wrap and refrigerate for at least 1 hour or overnight.
For the Ganache
- If you are going to frost the cake the same day, do this step before baking the cake.
- In a bowl, add chocolate chips.
- In a sauce pan, heat up the heavy whipping cream until you see small bubbles forming on the rim.
- Remove from stove and add the cream on top of the chocolate chips. Make sure all the chips are covered with the cream.
- Set aside for 5 mins. After 5 mins, using a whisk, mix mixture slowly. You will see that the chocolate starts melting.
- Once all the chocolate has melted, set aside for 2 hours.
- When the chocolate is not runny and is little thick, it is ready for frosting.
For the Frosting
- Place one layer of the cake on a cake stand. Add some ganache and spread it on the layer.
- Put the other cake on top of the frosted cake.
- Add some ganache on top of the cake and once done, frost the sides.
- And it’s done. J
- Just refrigerate the cake for an hour so that the ganache sets.
- Serve this mouthwatering cake with just a spoon..!! It’s super chocolaty.
For the Frosting with Perfect Edges
- I tried to make a small video on how to get the amazing edges like a professional. I hope you can understand the video. I haven’t made a video ever, so I apologize for any mistakes.
- You can just follow the video once you have roughly frosted the top layer.
- You will need a parchment paper, an offset icing spatula and a scraper which you can find at Wal-Mart.
- Once done, you can simply decorate the cake in any way you like.
- Just be careful that the ganache is not very thick. I made this mistake and I scraped a little cake at the bottom. L My ganache had become a bit thick. If this happens, just use a double boiler to melt the ganache a little or use a microwave.
- I have written down the steps in the video itself. You will be able to understand once you watch it (I hope)..!!
- I had made a video how to make the sides even, but my camera just didn’t record it.. L
- All you have to do is, take your offset icing spatula and put it under hot boiling water. Dry it with a paper towel and run it over the cake. Bring the spatula from the edges to the center of the cake. The hot spatula will even out the edges and smooth the cake surface.
- Just be careful that the spatula is dry, don’t drop any water as it will melt the chocolate. Do this a couple of times.
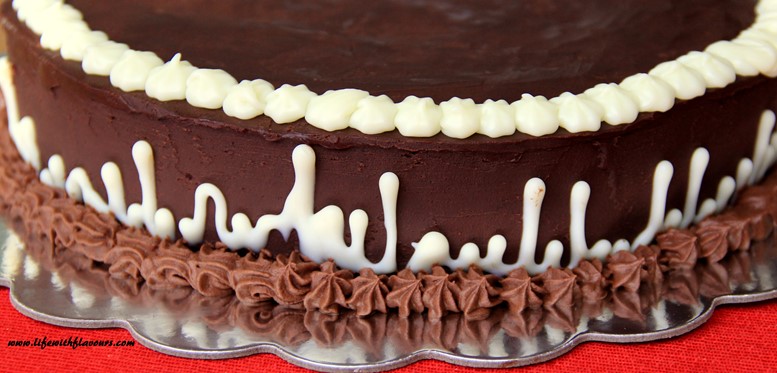
- Once don’t with that, using a star shaped nozzle and a piping bag, decorate the base of the cake with whipped chocolate ganache. Also, decorate the top of the cake with white chocolate ganache.
- Refrigerate for an hour. And your cake is done.
The best part would be when everyone appreciates and loves your cake. Your hard work will pay off..!! J
I hope you like my recipe.
Please follow my blog for more such recipes. J
You can also follow my page on Facebook- www.facebook.com/lifewithflavours


It looks so delicious!
LikeLike
Thanks alot Arielle..!! 🙂
You should really try it out..!! 😀
LikeLike